|

Ideas
This page is reserved for examples of great projects
you can do with your materials.
I will be having monthly crafting contests with the
winner receiving more crafting items!! YIPPEE!
|
|
|
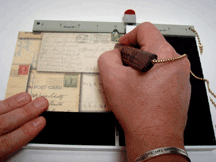
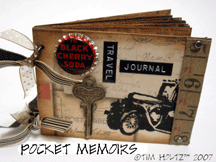
Project:
Pocket Memoirs ©2007 Tim HoltzTM
This
project featured artist/author Tim
Holtz, Designer & Sr. Educator for Ranger
Industries. Tim travels internationally to
trade shows and stores to educate and
introduce people to his world of inks and so
much more. As a well known Designer, Tim has
been a frequent guest on HGTV's The Carol
Duvall Show, and his projects can been seen
regularly in DVD's, books, stamping and
scrapbooking magazines.
The Scor-itTM
Mini Board
helped in the creation of his Pocket
Memoirs
Supplies:
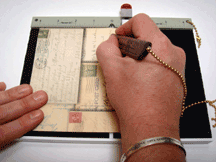
Steps for Creating the Covers: (click
to enlarge)
|
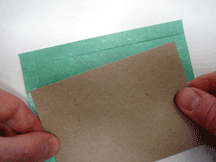
Cut 2 pieces of chipboard 4
3/4”x3 1/2” for covers.
|
|
|
Cut 1 piece of 9x9 distressables
paper in half at 4 1/2” then
each strip at 3 1/4”. This will
give you 4 pieces total (2 to
wrap the covers and 2 to finish
the inside covers)
|
|
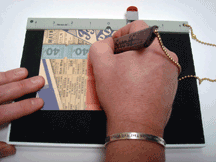
Set your Scor-it Mini to 1/2”
and score the 2 larger pieces at
1/2” all the way around. Line
paper up against guide and score
all 4 sides.
|
|
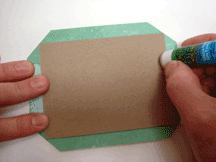
Apply glue stick to one side of
chipboard cover and adhere to the
center of the back of your cover
paper within your scored lines.
Repeat for other cover.
|
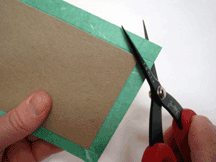
Cut off all
paper corners at angle up to
chipboard corners on both covers.
|
|
Apply glue stick
along edges of chipboard covers and
fold over paper tabs all the way
around. Hold to secure and let dry.
(Scoring the paper first allows for
an easier fold around covers).
|
|
Apply glue stick along edges of
chipboard covers and fold over paper
tabs all the way around. Hold to
secure and let dry. (Scoring the
paper first allows for an easier
fold around covers).
|
Apply glue stick
to smaller inside page and adhere to
back center of the covers.
|
|
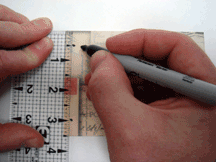
Line a ruler
along left edge of covers and
measure 1/4” in from edge and 1/2”
from the top and up from the bottom.
Mark both with marker to punch.
|
|
Punch marked
holes through chipboard covers using
a Crop-a-dile.
|
|
Ink edges of
covers (inside and out) with
Distress Ink using Ink Blending Tool
with Ink Blending Foam for a softer,
blended application.
|
|
Steps for Pocket Pages:
Cut 3 pieces of 9x9
distressables paper in quarters
to 4 1/2”x4 1/2”.
|
|
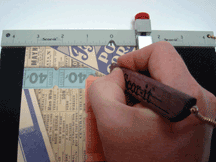
Set Scor-it Mini to 1” and score
ONLY ONE end of each page.
|
Fold scored
bottom of page up for pocket.
|
|
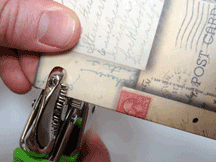
Secure on
the RIGHT SIDE ONLY with
stapler.
|
|
Place cover over finished pocket
page and justify to the left.
Mark holes to punch for pages.
Stack up to 6 pocket pages and
punch with Crop-a-dile. (This
tool can punch through several
layers of paper and chipboard at
once). Repeat for all pages.
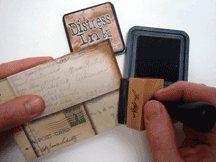
Ink edges of pages with Distress
Ink and Ink Blending Tool. (see
above steps)
Assemble book by stacking pages
between both chipboard covers
lining up holes on the left.
Insert binder rings through both
holes and secure.
Stamp on cover and embellish
with found objects, ribbons,
etc. Pockets are perfect for
memoirs of your journey through
everyday life. |
Enjoy the Journey….. Tim
|
|
|
|
|
Right Column Box
 |
|
|
Headline |
|
|
|
Hours: O
P E N
O P E N
O P E N
We're here 24/7
It's going to be an exciting year! More items coming
in every day.
If you don't see what you wish, be sure to ask, I am glad to
special order items for you (and maybe carry them) just because YOU
ASKED!
My warmest welcome to my customers....I'm so glad you
stopped by. Be sure to grab a cookie as you shop....mine have no
calories! :)
Would you like to open a web store? Don't get stuck with a
solution that controls you. Ask and I'll direct you to an
easy, fun and reasonable solution!
|
|
|
|
|