|

Ideas
This page is reserved for examples of great projects
you can do with your materials.
I will be having monthly crafting contests with the
winner receiving more crafting items!! YIPPEE!
|
|
|
Glossy Accents Projects
|
|
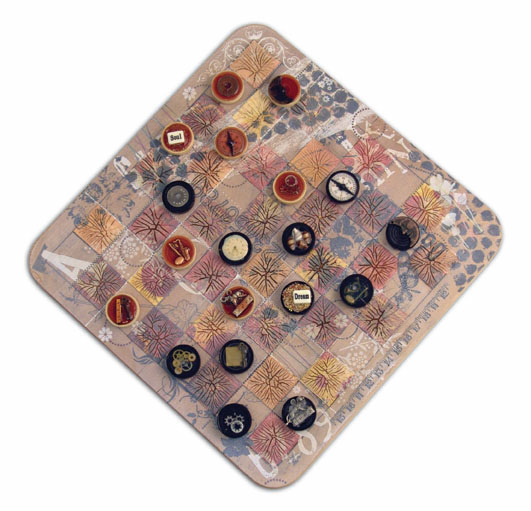
Altered Checkers Game Board
Skill
Level:
* *
Use Crackle Accents™, Sepia
Accents™ and Matte Accents™
to create a game board for
hours of fun!
Created by Lauren
Nwachukwu |
|
|
Materials List
|
|
|
•
Inkssentials™
Crackle Accents™
•
Inkssentials™ Sepia
Accents™
•
Inkssentials™ Matte
Accents™
•
Adirondack® Acrylic
Paint Dabber-
Espresso
• Paper Finishes
Workable Fixatif,
Krylon®, krylon.com
• Paper Finishes
Whitewash,
Krylon®, krylon.com
• Patterned Paper,
Daisy D’s,
daisydspaper.com
• Rub-ons: Art Rubs,
Wordsworth; Wholly
Cow, Basic Grey,
basicgrey.com;
Distressed Effects,
Dee’s Designs, My
Mind’s Eye,
mymindseye.com;
Metallic Foils EZ
Rub-ons, Royal &
Langnickel,
royalbrush.com;
MiniMarks, American
Crafts,
americancrafts.com;
Rub-on Stitching,
Die Cuts with a
View,
diecutswithaview.com;
Element Rubbings, 7
Gypsies,
7gypsies.com;
Transfers to Go, K &
Company,
kandcompany.com
• Wooden Checker
Board
• Sandpaper
• Double-Stick Tape
• Found objects for
game pieces (for
example: no-hole
beads, charms, watch
parts, watch faces,
game pieces, shells,
etc.)
|
|
Instructions |
| |
Altering the Game
Board:
(1)
Lightly sand off
protective coating
on game board.
(2)
Cut squares from
patterned paper to
cover black squares.
(3)
With double-stick
tape place tape in
place. Note: do not
use repositionable
tape, as the crackle
medium will lift the
paper up.
(4)
Cover board with
rub-ons. Between
layers of rub-ons
spray a light coat
of workable
fixative. Be sure
not to spray too
much, as it will
cause the rub-ons to
lift off.
(5)
Cover patterned
paper with Crackle
Accents. Be sure to
start the flow of
the Crackle Accents
on scrap paper.
Outline the square
and then fill in.
(6)
After Crackle
Accents has
completely dried
(overnight is best),
dab on Espresso
paint over cracks,
then wipe off excess
paint, so that the
cracks fill with the
paint and it pops.
Altering the Game
Pieces:
(7)
Fill black and white
game pieces with
found items and
other
embellishments.
(8)
Fill black pieces
with Matte Accents,
following steps for
use of Accents in
step 5.
(9)
Fill white pieces
with Sepia Accents,
following the steps
for use of Accents
in step 5.
|
|
|
|
|
| |
|
|
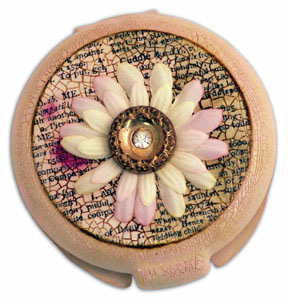 |
Baby Lois Compact with
Glossy Accents™
Skill Level:
* *
*
Create a new memory heirloom with Crackle Accents™ and
Glossy Accents™!
Created by Lisa Dixon, 2007 Ranger Design Team |
Materials List
|
| |
•
Adirondack® Acrylic Paint Dabber-
Lights, Shell Pink, Willow, Cloudy Blue
•
Inkssentials™ Glossy Accents™
•
Inkssentials™ Crackle Accents™
•
Inkssentials™ Non-Stick Craft Sheet
•
Inkssentials™ Cut n’ Dry™ Foam
•
Perfect Pearls™ Pigment Powders
-
Blush
•
Perfect Medium™ Stamp Pad -
Clear
•
Distress Ink™ Stamp Pad -
Brushed Corduroy
• Patterned Paper,
7
Gypsies, 7gypsies.com
• Transparency,
Staples brand, staples.com
• Dollar Store Mirror Compact
• Seed Beads,
Cream
and Pink, Mill Hill, millhillbeads.com
• Pin,
Making Memories, makingmemories.com
• Other – spray adhesive, alphabet beads,
natural muslin, pink scrap fabric, chipboard,
vintage button, foam paintbrush, quilt batting,
embroidery floss, needle, upholstery trim, silk
flowers, sandpaper
|
|
Instructions |
| |
(1) Sand
the outside surface of the compact and wipe away
residue with a damp cloth. If your compact
contains a cake of makeup, remove and discard.
(2)
Working on the Non-Stick Craft Sheet, use Cloudy
Blue Paint Dabber to cover the inside and
outside of the compact. Avoid paint on the
mirror portion of the compact.
(3)
When dry, follow with a coat of Shell Pink
paint. Add touches of Willow paint using a small
square of Cut n’ Dry foam. Allow the paint to
dry completely.
(4) Cut a circle from patterned
paper about two and one-half inches in diameter.
Use Cut n’ Dry foam to ink the edges with
Brushed Corduroy Distress Ink and adhere to the
outside lid of the compact.
(5) Use a foam paint brush to
apply a thin coating of Crackle Accents to the
entire outside of the compact. Some brushstrokes
will remain but you’ll achieve small
well-defined crackles with a thin coat of the
Accents. Allow to dry completely for all the
cracks to appear.
(6) Once dry, rub Brushed
Corduroy ink with square of Cut n’ Dry Foam over
the crackled surface to further define the
cracks. Wipe excess ink away with paper towel.
(7) Print vintage photo onto
transparency and trim to fit mirror portion of
the compact.
(8) Use Cut n’ Dry Foam to apply
Perfect Medium to the printed side of the
transparency. Use cosmetic brush to apply Blush
Perfect Pearls pigment powder to Perfect Medium
side of the transparency. Adhere the
transparency to the mirror using a spray
adhesive.
(9) Add Glossy Accents to cover
the photo and fill the mirror well. Use a pin to
immediately pop any air bubbles that form. Add
tiny seed beads into the wet glaze around the
perimeter of the mirror. Allow to dry to a clear
and shiny finish.
(10) Apply additional coats of
Glossy Accents as desired to add dimension and
to further secure the beads. Be sure to allow
each coat to dry thoroughly before adding the
next coat of glaze.
(11) To make the fabric inset
for the bottom of the compact cut a circle from
natural muslin about three and one-eighth inches
in diameter. Cut a small swatch from pale pink
fabric and use embroidery floss and needle to
stitch the word “Baby”. Tack to the muslin
circle and sew alphabet beads to spell out name
in beads underneath. Add some stitched buttons
beneath the name. Be sure your embroidery, beads
and buttons are centered in the muslin circle.
(12) Cut a circle from chipboard
and a circle from quilt batting both about two
and one-eighth inches in diameter. Sandwich the
batting between the chipboard and the
embellished muslin circle. Use a tiny amount of
spray adhesive on the batting to prevent
shifting. Turn all the layers over and snip the
overhanging edges of the muslin about every half
inch to create flaps. Use Glossy Accents to glue
each cut flap to the back of the chipboard. Use
the Glossy Accents to adhere a length of
upholstery trim around the edges and to glue the
fabric inset into the bottom of the compact. Add
a quilter’s pin to the embroidered swatch.
(13) Layer two pastel silk
daisies and attach the flowers to the lid of the
compact. Add a vintage button to the flower
center using strong double-sided tape to
complete the project.
|
|
|
|
|
Right Column Box
 |
|
|
Headline |
|
|
|
Hours: O
P E N
O P E N
O P E N
We're here 24/7
It's going to be an exciting year! More items coming
in every day.
If you don't see what you wish, be sure to ask, I am glad to
special order items for you (and maybe carry them) just because YOU
ASKED!
My warmest welcome to my customers....I'm so glad you
stopped by. Be sure to grab a cookie as you shop....mine have no
calories! :)
Would you like to open a web store? Don't get stuck with a
solution that controls you. Ask and I'll direct you to an
easy, fun and reasonable solution!
|
|
|
|
|